
So, what’s the problem?
I spent a whole week trying to polish the separation of my new iOS app into PRD and DEV environments — and making sure that all of my pods were working properly. Actually there were tons of how-to (including Medium, Stack Overflow) to separate environments, but still they were not in this whole combination:
- PRD / DEV : separation of GoogleService-Info.plist by using Build Config, Build Scheme, and automate them using Build Run Script.
- Cocoapods : linking all the pods to the different Build Configs — without throwing all those compile error “No such module”.
After a certain frustration, i guess it would be better to share what i found to the world. Hopefully someone who’s facing the same issue would benefit from it.
This is what you’ll get when you are done with this article
After you finish this whole article, you’ll have the following:
- Easily switching your Firebase DEV / PRD environment, by just 1 click
- xcode will automatically use your Firebase DEV or PRD config files (GoogleService-Info.plist) based on the environment that you chose. No manual intervention required.
- You can display image (or label) in your ViewController to differentiate if your app is running on DEV or PRD.
- And best of all: you’ll have a tool to ensure that your PRD Google Analytics data will not be flooded by all those DEV & TEST data.
Cool, huh? Let’s dive in !!

1. Separation of PRD / DEV Build Scheme
This step will cover the following:
- Separation of Build Configurations
- Separation of Build Scheme
1.1. Separate Build Configurations
Normally xcode would generate 2 Build Configurations “Debug” and “Release” as standard issues for new project. You are going to duplicate both configs into so called DEV configs.
Open xcode, and go to your “PROJECT”. On the “Editor” menu, tap “Add Configuration” → “Duplicate “Debug” Configuration” and name it “Debug-DEV”

After you finished, you’ll have the following configs

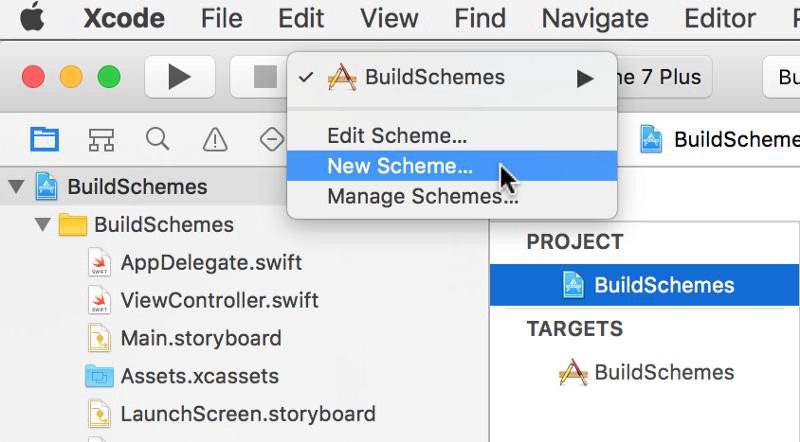
1.2. Separate Build Scheme
You’ll basically create a new Build Scheme, and tag the newly created DEV Build Configs to them.
On your xcode, select your scheme and tap “New Scheme…” and name it with “-DEV” suffix (for example if your current Build Scheme name is “MyAwesomeProject” you would create a new “MyAwesomeProject-DEV” Build Scheme .
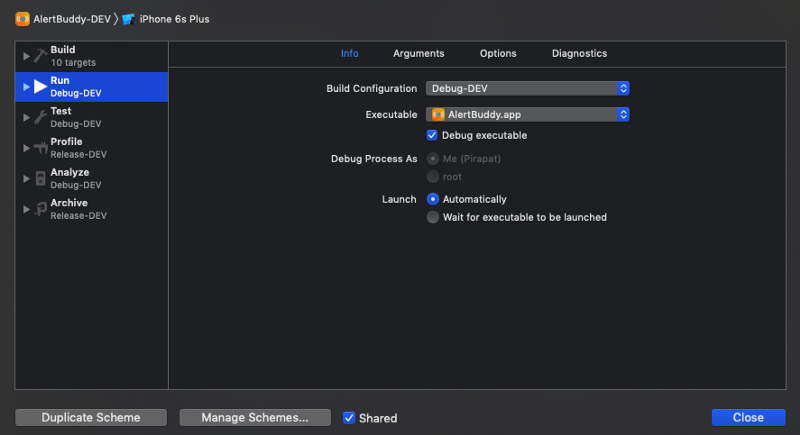
Then you go on and choose “Edit Scheme…” of newly created one, and tag DEV Build Configs to it.
- Run → Debug-DEV
- Test → Debug-DEV
- Profile → Release-DEV
- Analyze → Debug-DEV
- Archive → Release-DEV
Wow. That takes care the the Build Scheme/Build Config. Good Job !!

Now move on to deal with the Cocoapods part.
2. Modification of Cocoapods “pod file”
This step will cover the following:
- Modify pod file to cope with the new DEV Build Configs
- Modify DEV Build Scheme to ensure all pods to be built properly
2.1. Modify “pod file”
Go to your project directory, and edit your pod file. Now in the “Project” line, you just add the following (in bold text):
, ‘Debug-DEV’ => :Debug, ‘Release-DEV’ => :Release
project 'AlertBuddy.xcodeproj', 'Debug-DEV' => :debug, 'Release-DEV' => :release
project
 platform :ios, '10.0'
target 'AlertBuddy' do
  use_frameworks!
pod 'SwiftyJSON'
  pod 'Firebase'
  pod 'Firebase/Auth'
…
Then run pod install normally. That should tell Cocoapods to recognize your new DEV Build Configs.
2.2. Modify DEV Build Scheme
Go to your DEV Build Scheme (e.g. MyAwesomeProject-DEV) and tap “Edit Scheme…”.
On the “Build” section, move all your Pods to be on top of your project build. And ensure that the “Shared” check-box is ticked.

Wait, what !! That’s it ?!!?
Yeah. Simple, huh?

Now, let’s go to the final leg of this article. You’ll automate the switching of the GoogleService-Info.plist between PRD / DEV.
3. Automate GoogleService-Info.plist PRD / DEV switching
Now is the good part. It’s where you’ll link them together. This involves the following:
- Make your PRD, DEV folders containing separate GoogleService-Info.plist (that’s right, you’ll need to have your Firebase plist both PRD and DEV project in hand)
- Add Build Run Script to automate switching of plist files when you switch your Build Scheme
3.1. Separate GoogleService-Info.plist into PRD / DEV
In Finder, go to your project folder, and create a folder named “Firebase”, and copy your PRD plist and DEV plist inside. Make sure that you use different names (e.g. PRD = GoogleService-Info-PRD.plist and DEV = GoogleService-Info-DEV.plist)

Drag this folder into your xcode, project folder (the same location you would put your appdelegate.swift file)
3.2. Add Build Run Script to automate switching of plist
In build TARGETS, tab “Build Phases”, add new Run Script named “Firebase plist”, and add the following script (/bin/sh).
You can modify the PATH_TO_GOOGLE_PLISTS to be your folder containing DEV and PRD plist files.
PATH_TO_GOOGLE_PLISTS="${PROJECT_DIR}/AlertBuddy/Firebase"
case "${CONFIGURATION}" in
"Debug-DEV" | "Release-DEV" )
cp -r "$PATH_TO_GOOGLE_PLISTS/GoogleService-Info-DEV.plist" "${BUILT_PRODUCTS_DIR}/${PRODUCT_NAME}.app/GoogleService-Info.plist"
echo "Using DEV plist"  ;;
"Debug" | "Release" )
cp -r "$PATH_TO_GOOGLE_PLISTS/GoogleService-Info-PRD.plist" "${BUILT_PRODUCTS_DIR}/${PRODUCT_NAME}.app/GoogleService-Info.plist"
echo "Using PRD plist"  ;;
*) ;;
esac

That’s it !! You can select DEV Build Scheme and try to build & run.
Now you can simply switch the Build Scheme to run your app in Firebase PRD or DEV project accordingly.
Time to celebrate !!!!

4. Bonus Steps — Add Swift Flags
Since you’ve been such a good reader, let me give away some extra bonus !!
You can also detect — in your swift code — which environment you are using by using “Other Swift Flags”.
For example, you can add an UIImage or UILabel to your ViewController, so you know which environment you are using. Or even use that flags to select which Cloud Functions URL that you’ll be using. Pretty neat, huh?
4.1. Add “Other Swift Flags”
Go to your TARGETS, tab “Build Settings”, in “Other Swift Flags” section. In your “Debug-DEV” and “Release-DEV” item, add the “-DDEV” flag.
I know you must be wondering what the hell is “-D” for. Just know that it’s a flag that xcode use in the command line, and whatever name comes after “-D” will be used as the flag in your swift code.

4.2. Use that flag in your swift code
Now you can use the flag in your code. We can simply use a global variable in AppDelegate, e.g. “isDevMode” as a boolean flag. It goes something like this…

In this code, we’ll just set “isDevMode” variable, based on whether we are using “-DDEV” flag (in our DEV Build Config). And you can use it to display image, print to console, etc. Like so…


Wrap Up
That’s it !! Now you can separate your Firebase iOS app into PRD / DEV environments, while keeping all your pods intact. Better still, you can auto switch your Google plist by simply switching between your Build Scheme.
Hope you enjoy and benefit from this article. You can lookup for more article like this and our other products & services from Sigma Genesis.
Visit our website: https://sigmagenesis.com
